SlugOS For Dummies
-- Updated to BarracudaDrive 6.1, March 2013
 |
How to create your own online document/data server.
See also: |
SlugOS is a Linux distribution for the Linksys NSLU2. Installing SlugOS and installing the various tools are normally a daunting task if you are either new to Linux or have never used Linux before.
The following guide will help a person with little or no Linux experience install SlugOS on the NSLU2 and configure the NSLU2 to run the BarracudaDrive server. When you have the BarracudaDrive server running on the NSLU2, the server can be used for more that just a NAS. In addition to functioning as a NAS, with the BarracudaDrive server, your local network can also be accessed remotely. BarracudaDrive lets you or multiple users access and work with electronic documents or any type of data stored on your NSLU2 from remote locations.
Before you begin, make sure you have the following:
| Hardware: | Software: |
|---|---|
|
Click the above links and install the software on your PC now.
PuTTY is used when connecting to the NSLU2. You do not need to understand the Linux commands we present; just make sure you follow exactly as explained. The commands presented below are designed to be copied and pasted into the PuTTY terminal window.
Our example setup:
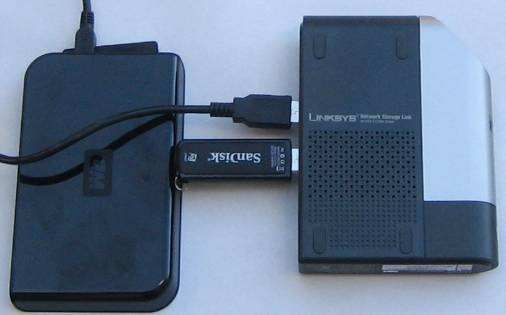
Why use two drives?
The SlugOS Linux distribution and BarracudaDrive will be installed on the flash drive. The idea is to use flash memory for the BarracudaDrive applications such as the Content Management System and the standard USB hard drive for storing documents and files. The standard USB hard drive will automatically spin down when not in use. The drive will only power on when used by the Web File Manager or the WebDAV server -- i.e. when being used as a NAS. All other access to the BarracudaDrive server is via the USB flash drive. This setup will provide a system that will be very reliable for many years to come.
Preparing And Checking The NSLU2
Before installing OpenSLug, power on the NSLU2 with the default Linksys software. You can find the drive on your network by using the supplied CD. The default address for the NSLU2 is 192.168.1.77, thus you can access the server from your browser using http://192.168.1.77.
The recommendation for the NSLU2 is to use a static IP address. However, we recommend using a dynamic IP address if you have a router that gives you a list of the connected DHCP clients. For example, Linksys and D-Link routers provide a DHCP client list when you login to the router's web-interface. You can easily spot your NSLU2 if your router gives you the information. In addition to providing a DHCP list, many routers allow you to lock a DHCP client such that the IP address will never change. For example, on a D-Link, you click the DHCP button and lock the NSLU2's IP address using "static DHCP".
If you would prefer to use DHCP with the NSLU2, browse to the NSLU2's web-interface and change the settings such that it uses DHCP. Reboot the NSLU2 and verify via your routers DHCP list and verify that you can access the NSLU2's web-interface by using the IP address listed by your router. We suggest that you physically unplug the power to the router and the NSLU2 if you use the static DHCP settings in the router. Plug the power cables back in and turn on the devices.
Installing The SlugOS Software
Note the NSLU2 must be powered off when you start the following procedures:
- Download SlugOS to your PC and unzip the zip file.
- Use the reset-button method to enter upgrade mode. See the following link for more information: Enter Upgrade Mode.
- Start the Sercomm Software Update Utility you should now have downloaded and installed on your PC.
- Open the Browse menu and select Browse Targets.
- The tool should find your NSLU2.
- Click on the Files button and select slugosbe-5.3-beta-nslu2.bin or the bin file you unzipped from the SlugOS download.
- Click the Upgrade button.
- This will start the upgrade process.
- The NSLU2 will automatically reboot when the upgrade is completed. You will hear 3 beeps when the NSLU2 is ready.
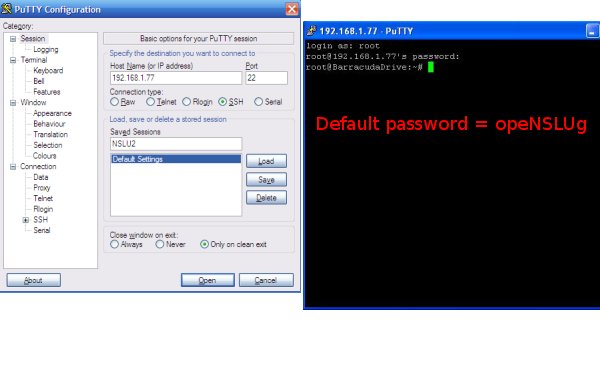
- Start the installed PuTTY SSH client when the NSLU2 is ready.
- In the Host Name field, enter the IP address to your NSLU2. The IP is 192.168.1.77 unless you have changed the NSLU2 to use DHCP.
- Click the SSH radio button.
- Enter a name in the saved session such as NSLU2. Press the save button.
- Double click on the saved name to open the terminal window.
- You will get a warning message the first time you attempt to login to the NSLU2. Accept the warning and press OK.
- A black terminal window should appear with the text: login as:
- Enter the name root i.e. the Linux administrator username.
- Enter the password opeNSLUg, which is the default password.
- You should now be logged into the NSLU2.
The PuTTY configuration window and the terminal window when logged into the NSLU2:
Preparing the External USB Flash Memory
The commands presented below are designed to be copied and pasted into the PuTTY terminal window. You do not need to understand the commands.
The following procedure initializes the NSLU2.
- If you have not already inserted the flash memory, insert the USB flash drive into the "disk 1" slot on the back side of the NSLU2. Make sure you insert the flash drive into slot 1 and not slot 2.
- Copy the command below and paste the command into the PuTTY terminal window. Select all data below.
#----------------------------------------------------
turnup init
#----------------------------------------------------
When the above command is running, the following will be printed on the console. You must enter a new password. The other options are optional. Press enter to use the default values.
root@BarracudaDrive:~# #------------------------------------------------
root@BarracudaDrive:~# turnup init
Please enter a new password for 'root'.
The password must be non-empty for ssh login to succeed!
Changing password for root
Enter the new password (minimum of 5, maximum of 8 characters)
Please use a combination of upper and lower case letters and numbers.
Enter new password:                <-- Enter a new password
Re-enter new password:
Password changed.
Host name [BarracudaDrive]:        <-- Select a name for the NSLU2
Domain name [workgroup]:
Boot protocol (dhcp|static) [dhcp]: <-- We use dhcp
The following procedures: save the above settings, format the USB flash memory, and copy the SlugOS to the USB flash memory.
- Copy the commands below and paste the commands into the PuTTY terminal window. Make sure you select and copy all data in the black window below.
#----------------------------------------------------
turnup preserve
umount /media/sda1
mkfs.ext3 /dev/sda1
turnup memstick -i /dev/sda1
#----------------------------------------------------
You will see lots of information being printed in the terminal window. Wait for the commands to complete.
How To Reboot
You must now reboot the NSLU2. You will have to reboot the NSLU2 a few times to complete the installation.
To reboot:
- Type the command reboot in the PuTTY terminal window and press the enter key.
- Close the PuTTY terminal. Click OK when PuTTY asks you to close the window.
- Wait for the NSLU2 to reboot. You will hear 3 beeps when the NSLU2 is ready.
- Start PuTTY again and login as user root, but this time, use your new password.
Installing Software for the NSLU2
We must install some software before we can install BarracudaDrive. The following commands create a swap disk and install a number of required programs.
- Copy the commands below and paste the commands into the PuTTY terminal window. Make sure you select and copy all data in the black window below.
#----------------------------------------------------
echo "Create swap and install required packages"
dd if=/dev/zero of=/swapfile bs=1M count=32
mkswap /swapfile
echo '/swapfile swap swap defaults 0 0' >>/etc/fstab
swapon -a
opkg update
opkg -force-overwrite install joe nano bash file gawk util-linux procps coreutils ntpclient openssl
echo "Set correct time and date"
ntpclient -s -h pool.ntp.org
echo "Reducing memory: Disabling getty"
sed 's?S:2345:respawn:/sbin/getty 115200 ttyS0?#S:2345:respawn:/sbin/getty 115200 ttyS0?' /etc/inittab >/tmp/inittab
cp /tmp/inittab /etc/inittab
#----------------------------------------------------
It will take some time before the above commands are completed. Wait for the commands to complete.
Final Reboot
You must now reboot the NSLU2 again. Follow the reboot procedures as previously explained.
Installing BarracudaDrive
We are now ready to install BarracudaDrive. The procedures below: create a dedicated Linux user for the BarracudaDrive server, download BarracudaDrive, install BarracudaDrive, configure BarracudaDrive, and start BarracudaDrive.
- Copy the commands below and paste the commands into the PuTTY terminal window. Make sure you select and copy all data in the black window below.
#----------------------------------------------------
echo "Creating the bd (BarracudaDrive) user"
#http://linux.die.net/man/1/busybox
adduser -G daemon -h /home/bd -s /bin/bash -D bd
cd /home/bd

echo "Downloading BarracudaDrive"
wget barracudadrive.com/bd.OpenSlug.tar.gz
echo "Unpacking BarracudaDrive"
tar xvzf bd.OpenSlug.tar.gz
echo "Installing BarracudaDrive (Linux boot auto start)"
cd InstallDaemon
chmod +x install.sh
./install.sh
cd ..

echo "Setting BarracudaDrive Linux login user to 'bd' in boot script"
sed 's/BDUSER=root/BDUSER=bd/' /etc/init.d/bdd >/tmp/bdd
cp /tmp/bdd /etc/init.d/bdd
chmod +x /etc/init.d/bdd

echo "Installing the SSL certificate wizard"
#Requires OpenSSL, which we have already installed
cd applications
wget barracudadrive.com/unix/sslcert.zip
cd ..

echo "Cleaning up"
rm -r InstallDaemon
rm bd.OpenSlug.tar.gz

chown -R bd /home/bd
chgrp -R daemon /home/bd
chmod -R o-w *
chmod -R o-r *
chown root bdd bd.zip
chmod 750 bdd bd.zip

echo "Starting BarracudaDrive"
/etc/init.d/bdd start
#----------------------------------------------------
The BarracudaDrive server should now be running. To access the BarracudaDrive server enter http://the-NSLU2-IP-address in a browser. Example: http://192.168.1.77/
What you see is the BarracudaDrive Content Management System. The next step is to configure BarracudaDrive. Enter the URL http://the-NSLU2-IP-address/setup/ in a browser. Example: http://192.168.1.77/setup/
Follow the configuration wizard. We suggest watching the configuration video by clicking the video button in the top left corner of the configuration wizard.
Configuring the optional hard drive
If you plan on adding the extra drive, insert the USB plug into "disk 2" in the NSLU2 now. It is OK if you have already plugged the drive in.
Warning: You should not have anything on the drive as the drive will be formatted!!!
Copy and paste the following commands into the PuTTY terminal window. The command formats the drive using a Linux file system. We do not use use a DOS file system as there would be problems with access rights for the BarracudaDrive server.
#----------------------------------------------------
umount /media/sdb1
echo "Formatting the drive using a Linux file system"
mkfs.ext3 /dev/sdb1
#----------------------------------------------------
It will take some time before the drive is formatted. Wait for the command to complete before proceeding.
- Unplug the extra hard drive's USB cable
- Wait 20 seconds
- Plug the extra hard drive's USB cable back in
- Wait 40 seconds
Copy and paste the following commands to set the access rights for BarracudaDrive. The commands below also install a tool that will make the hard drive spin down manager in BarracudaDrive function.
#----------------------------------------------------
chown -R bd /media/sdb1
chgrp -R daemon /media/sdb1

echo "Creating link from WFS root directory to external disk @ USB 2"
ln -s /media/sdb1 /home/bd/disk/external
chown bd /home/bd/disk/external
chgrp daemon /home/bd/disk/external

echo "Installing Optware so we can install sdparm using ipkg"
setup-optware.sh
ipkg update

echo "Installing sdparm, which is used for HD spin down"
ipkg install sdparm

echo "Setting sudo bit so BarracudaDrive can spin down the disk"
chmod a+s /opt/bin/sdparm
#----------------------------------------------------
When you login to the BarracudaDrive Web File Manager or use the WebDAV server, the directory "external" should be visible. This directory is your new extra disk you just installed. Anything outside of the "external" directory is on your USB flash drive.
The next step is to learn more about the Web file Manager and the WebDAV server so you can use the NSLU2 as a local or external NAS. Go to the Web File Manager home page and click the video. The hard drive spin down manager can be found at the following URL: http://the-NSLU2-IP-address/spindown/
Upgrading
Do the following after you have installed BarracudaDrive on the NSLU2 if you are upgrading or moving BarracudaDrive from another operating system.
- From the original BarracudaDrive, zip together all files that end with .dat and the content of the data directory.
- Copy the zip file, using the Web File Manager, to the NSLU2.
- Login to the NSLU2 using PuTTY.
- Change user from root to bd by typing: su bd in the terminal
- Copy the zip file to /home/bd
- Unzip the zip file
- Restart BarracudaDrive or the NSLU2.
Do you have any suggestions or improvements to this guide?
Send us a message.