
FuguHub
Manage Data Your Way
Windows File Sharing Over the MxTunnel
(SMB/CIFS/Samba)
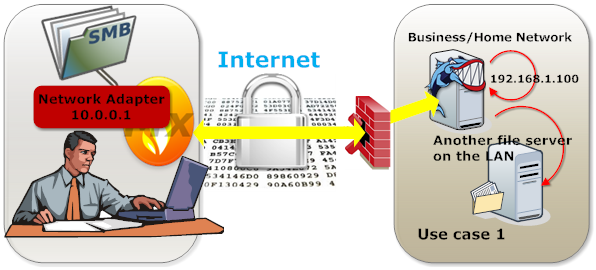
The following instructions are for enabling Windows File Sharing (SMB/CIFS/Samba) over the MxTunnel.
The SMB/CIFS protocol is designed for Intranet use and, for security reasons, should not be exposed directly to the Internet. However, a tunnel connection can be set up to allow external users secure access to company/home file sharing server(s).
Setting up the tunnel requires extensive networking experience. This is because the SMB/CIFS client in Windows does not support the SOCKS protocol, nor can you use GetMyLAN since GetMyLAN only works with installed applications and not directly with integrated Windows components such as SMB/CIFS.
The instructions below are based on a more detailed tutorial that is written for SSH tunneling. Tunneling over the MxTunnel is similar to tunneling over SSH; however, the MxTunnel is easier to set up. Please see the original article if you run into problems. You should also consider using FuguHub's integrated WebDAV server as an alternative to using SMB/CIFS. The WebDAV server is designed to be secure on the Internet.
Steps are as follows:
- Create a loopback adapter on the Windows client computer (laptop in the above image)
- Configure the new loopback adapter
- Reboot
- Configure the MxTunnel connections
- Test the Windows Tunnel Network
Create the Loopback Adapter on Windows
We will give your computer an additional virtual IP address by setting up a new loopback adapter, and we will use the virtual IP address for tunneling purposes when tunneling to the far side network. Windows will let you continue to do file sharing on the real IP address (local network). We will assign the loopback adapter an IP of 10.0.0.1 and we will set up tunnels that bind to this address. You can use any IP address for your virtual address, but we recommend using 10.0.0.1, which is a privately routable address that most networks do not use.
- System -> Control Panel -> Add Hardware
- Select "Yes, I have already connected the hardware" and click Next
- Select "Add a new hardware device" (at bottom of list) and click Next
- Select "Install the hardware that I manually select..." and click Next
- Select "Network adapters"
- Select "Microsoft" and then "Microsoft Loopback Adapter"
- (Go through the installation procedure.)
Configure the Loopback Adapter
- Open your new new loopback ethernet adapter (Network Connections)
- Enable Client for Microsoft Networks.
- Disable File and Printer Sharing for Microsoft Networks
- Enable Internet Protocol (TCP/IP)
- Click on properties for TCP/IP.
- Enter your chosen IP address (10.0.0.1), subnet mask (255.255.255.0). You can leave gateway blank.
- Under advanced->IP Settings, Deselect Automatic metric and fill in the value of 9999 as the 'Interface metric' as shown above.
- Under advanced->WINS, Enable LMHosts Lookup and Disable NetBIOS over TCP/IP
Reboot
You may have to reboot your computer. Check if your new 10.0.0.1 network is up and running by using ipconfig or simply reboot.
Configure the MxTunnel Connections
From the original article, we get that SMB/CIFS requires forwarding of ports 137, 138, 139, and possibly 445. We did not use port 445 during our testing.
The original article also forwards to the same computer, i.e., to localhost (127.0.0.1). This will not work if FuguHub is running on a Windows computer and you want to access the Windows network on the same computer. You must use your computer's real IP address. We use the address 192.168.1.100 in the tests below since that is what our Windows computer used. Substitute the IP address with whatever IP address your Windows or Samba server is using.
Note: you can also connect to other SMB/CIFS servers on the same network where FuguHub is installed. The SMB/CIFS server does not have to be on the same server where FuguHub is running.
You will get the help page by typing MxTunnel -help on the command line.
From the help page, a tunnel is setup as follows:
- "localaddress" is the virtual (new loopback) address 10.0.0.1, i.e., it is the local address we want MxTunnel to bind to.
- "localport" is one of the ports listed above, and "remoteport" must be the same since we are tunneling to the same port.
- "remotehost" is the SMB/CIFS server that can be reached from the location where the FuguHub server is installed. The address is 192.168.1.100 in our test.
The complete tunnel command is:
The above must be on one line.
Test the Windows Tunnel Network
- In your Windows computer: click the "Windows start button", right click "computer"
- Select "Map network drive..."
- In the Folder field, enter \\10.0.0.1\share-name
You must know the share name. Substitute "share-name" above with your share name.
Tip!
The tunnel session can be saved to a file and securely distributed to your users. The users would then simply have to load the session file as follows: MxTunnel -load session-name
|
|
|
This web site is powered by the FuguHub Web/Application Server.
© 2022 Real Time Logic LLC, California, USA. All rights reserved.
Powered by the Barracuda Embedded Web Server and the SharkSSL Embedded SSL Stack.